

Winterizing Your Ember Overland Series Water Systems for Cold Weather
Oct 11, 2022Whether you have it done professionally, or do it yourself at home, winterizing your Ember Recreational Vehicle properly is an important part of your annual maintenance routine. Frozen water can do serious damage to an RV. Repairs for this type of damage are almost always costly. Thankfully, the winterization process is relatively easy if you work with a checklist and double-check your work as you go. Your Ember Overland Series is also equipped with the Nautilus P2.5 System–which makes the winterization process much easier.
How to Prep for Winterizing
Dump your black and gray tanks (and give your black tank a good flush) on your last camping trip of the season.
Turn off your Truma Combi completely (furnace and hot water) the night before winterizing to ensure that no hot water is in its tank when you winterize the unit.
What You Will Need
Approximately 3 Gallons of Non-Toxic RV Antifreeze
Siphon Hose
Phillips Head Screwdriver
3 Gallon Bucket (or Larger)
A Large Bowl
(Optional) Oil Free Air Compressor
(Optional) Blow Out Hose or Blow Out Adapter
Step 1: Drain Black and Gray Tanks Again
Even if you dumped your black and gray tanks at your last campground or dump station stop, you may want to empty them one more time. It is common for residual liquid to find its way into the tanks after driving your RV home. If you can dump this residual liquid in a safe and sanitary fashion, please do so.
Step 2: Drain the Hot and Cold Water Low Point Drains
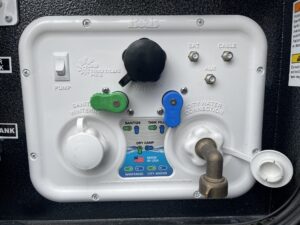
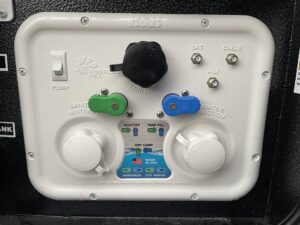
Set your Nautilus handles to the “Tank Fill” position as seen in the picture below:
Find your low point drains (located under the Nautilus System) and open them both to drain. They are clearly marked with a sticker that says “low point drain.” To help increase air flow, open up a hot and cold water faucet inside the coach. This will drain the system more quickly and thoroughly. Close these interior faucets once this step is completed–but leave the hot and cold water low point drains open.
![]()
Step 3: Drain the Fresh Water Tank:
Locate the fresh water tank release valve (to the right of your low point drains) and pull it open and let it drain completely. This drain is clearly marked with a sticker that says, “fresh water drain.” Leave the fresh water tank drain open.
Step 4: Drain the Truma Combi
Now it is time to go inside your rig and drain the tank of your Truma Combi. Before starting this step, you must make sure that your furnace and water heater have been turned off on the Combi’s control panel and that there is no hot water inside of the Combi’s tank. It is also advisable to close your propane tanks before proceeding. The Combi is located underneath your Murphy Bed. Flip up your Murphy Bed to gain access to this area and remove the wood panel above the Combi. The wood panel is screwed down to the couch frame. Use a Phillips head screwdriver to remove the panel.
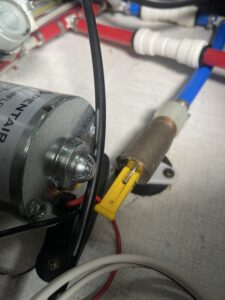
To drain the Combi’s tank, open the yellow drain valve by moving the lever 90 degrees (see photo below of the drain valve in the open position).
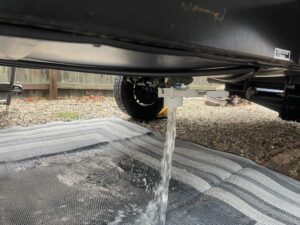
It is advisable to place a 3 gallon (or larger) bucket underneath the Combi’s drainage hose before opening the yellow drain valve as described above. This hose is located directly underneath the Combi and close to the left of your Ember’s low point drains. Please note–the Combi’s drainage hose is not the clear hose to the extreme front of your rig–that is an air intake valve to help the Combi drain.
When the Combi drain valve is in the open position you will be able to hear the water draining from the tank. Using a three gallon bucket will allow you to go back outside and make sure that the Combi’s 2.64 gallon tank has been properly drained and that there is no water left inside the appliance.
Leave the Combi’s drainage valve open for the winter to ensure that no water is accidentally left inside the tank. Remember to close this valve in the spring before dewinterizing your Ember so that water does not pour out of the drainage hose.
Step 5: Bypass the Truma Combi Before Using Compressed Air and Antifreeze
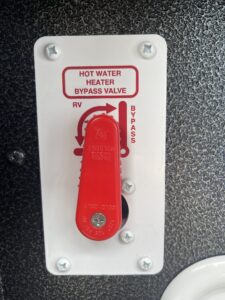
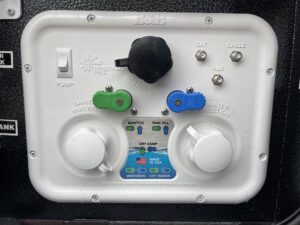
Before introducing compressed air (which is optional) and/or antifreeze into your Ember’s water system, you must put your Nautilus system into bypass mode as seen in the picture below. This isolates your Truma Combi from the rest of your water system and ensures that it is not damaged by compressed air, or by filling it with antifreeze. Blowing compressed air into the Combi, or filling it with antifreeze are not recommended by Truma, and doing so may void the appliance’s warranty.
Step 6: Blow Compressed Air Through the Water System
This step is optional. Many RV owners and experienced RV technicians skip this step because they have full confidence in using antifreeze to protect an RV’s plumbing systems. If you want to blow out the lines in your RV using compressed air, please use an oil free air compressor and do not exceed 40 PSI during the process. Exceeding 40 PSI can damage your RV’s water lines.
Before connecting your compressor to the Nautilus system’s city water connection, turn the blue and green handles on your Nautilus system to city water/winterized mode as pictured below. You will need a blow out hose or a blow out adapter to connect your compressor to the Nautilus system. Depending on the type of blow out adapter that you use, you may need a second pair of hands for this step.
Once your air compressor is on (at 40 PSI max) it should blow out some water from your low point drains and your fresh water drain if you left them open in the previous steps. If they were not left open–open them now. Close them up after water is done draining out.
Then blow out the hot and cold lines for your outdoor shower, which is located directly above the Nautilus system. After blowing out the water in your outdoor shower using your spray hose, blow out the water in your spray port on the other side of the unit to the left of your door (you can use the same spray hose for both). After flushing both of those, head inside to continue blowing out all of the lines one at a time. First blow out the hot and cold lines on your kitchen faucet, then close them, and repeat the process for your bathroom sink, your interior shower, and finally, your toilet. You may also blow out your black tank flush by removing your compressor from the city water inlet, and inserting it into your black tank flush for about 30 seconds.
Step 7: Flush the Water System with Antifreeze
Before adding antifreeze, make sure that all of your low point drains, fresh water drain, and interior faucets are closed, along with your indoor and outdoor showers. Now that your tanks and lines have been drained and your Truma Combi has been bypassed, it is time to flush your Ember’s water system with antifreeze. You will need approximately 3 gallons of antifreeze (and a siphon hose) to completely flush the system and fill your traps with antifreeze. Before adding antifreeze, make sure that all of your interior faucets are closed, along with your indoor and outdoor showers. At this point make sure to put your Nautilus system into “city water/winterized” mode on its control panel–see below for photo.
Your Showermiser should remain in the open position during this step so that antifreeze will flow through the shower head, instead of being directed back into the fresh water tank.
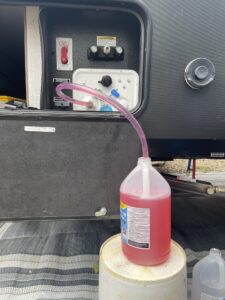
Next, open up a gallon of antifreeze and insert the non-threaded end of the siphon hose into the gallon of antifreeze, then attach the threaded end to the “sanitize/winterize” input on your Nautilus system and turn the water pump on. At this point you will see the antifreeze being sucked out of the gallon jug and into your RV’s water system.
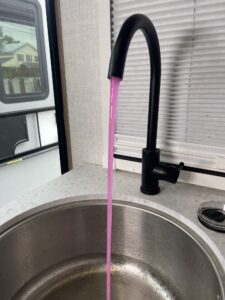
Start flushing the system by opening your outdoor shower line until antifreeze starts coming through the shower hose–make sure to do this for both hot and cold water lines. Next, disconnect the hose from your outdoor shower and head over to the spray port on the other side of the trailer to the left of the door. Connect the hose to the sprayport and flush antifreeze through the hose. After flushing the shower and spray port go inside of your rig and open up the cold water line on the kitchen sink faucet. If there is water still in the lines, it will drain out before the antifreeze comes out. Catch this initial burst of water with a bowl and dispose of it so it does not end up in your gray tank. Then close the cold water line and repeat this process for the hot water line. If you used compressed air, the amount of water should be minimal.
Next, head into your bathroom and repeat this process for your bathroom sink, remembering to flush antifreeze through your hot and cold water lines–and remembering that an initial burst of water may come out first. After visibly seeing antifreeze come through your hot and cold lines in the kitchen sink, repeat the process for your indoor shower. Then flush your toilet until all water is drained and antifreeze becomes visible. Leave some antifreeze in the bottom of the toilet to protect the drain valve during the winter.
Step 9: Add Antifreeze to the traps below the kitchen sink, bathroom sink, and shower
Pour a cupful (or more) of antifreeze down the kitchen sink, bathroom sink, and shower drain to fill each of the traps and ensure that water is displaced by antifreeze in each of them.
This completes the process of winterizing your Ember Overland Series Recreational Vehicle, It is advisable to double check your work at this point and make sure that every tank has been drained, and that antifreeze has flowed through the toilet and every faucet and hose (inside and outside of your RV) and that every trap has been filled with antifreeze.